Crown of Duck
In 2018 for our 40th anniversary, we had the great fortune to dine at Eleven Madison Park in New York City. This 3 star Michelin restaurant was at the time rated the best restaurant in the world by S.Pellegrino, and the chef Daniel Humm’s signature dish was and remains his lavender roasted duck.
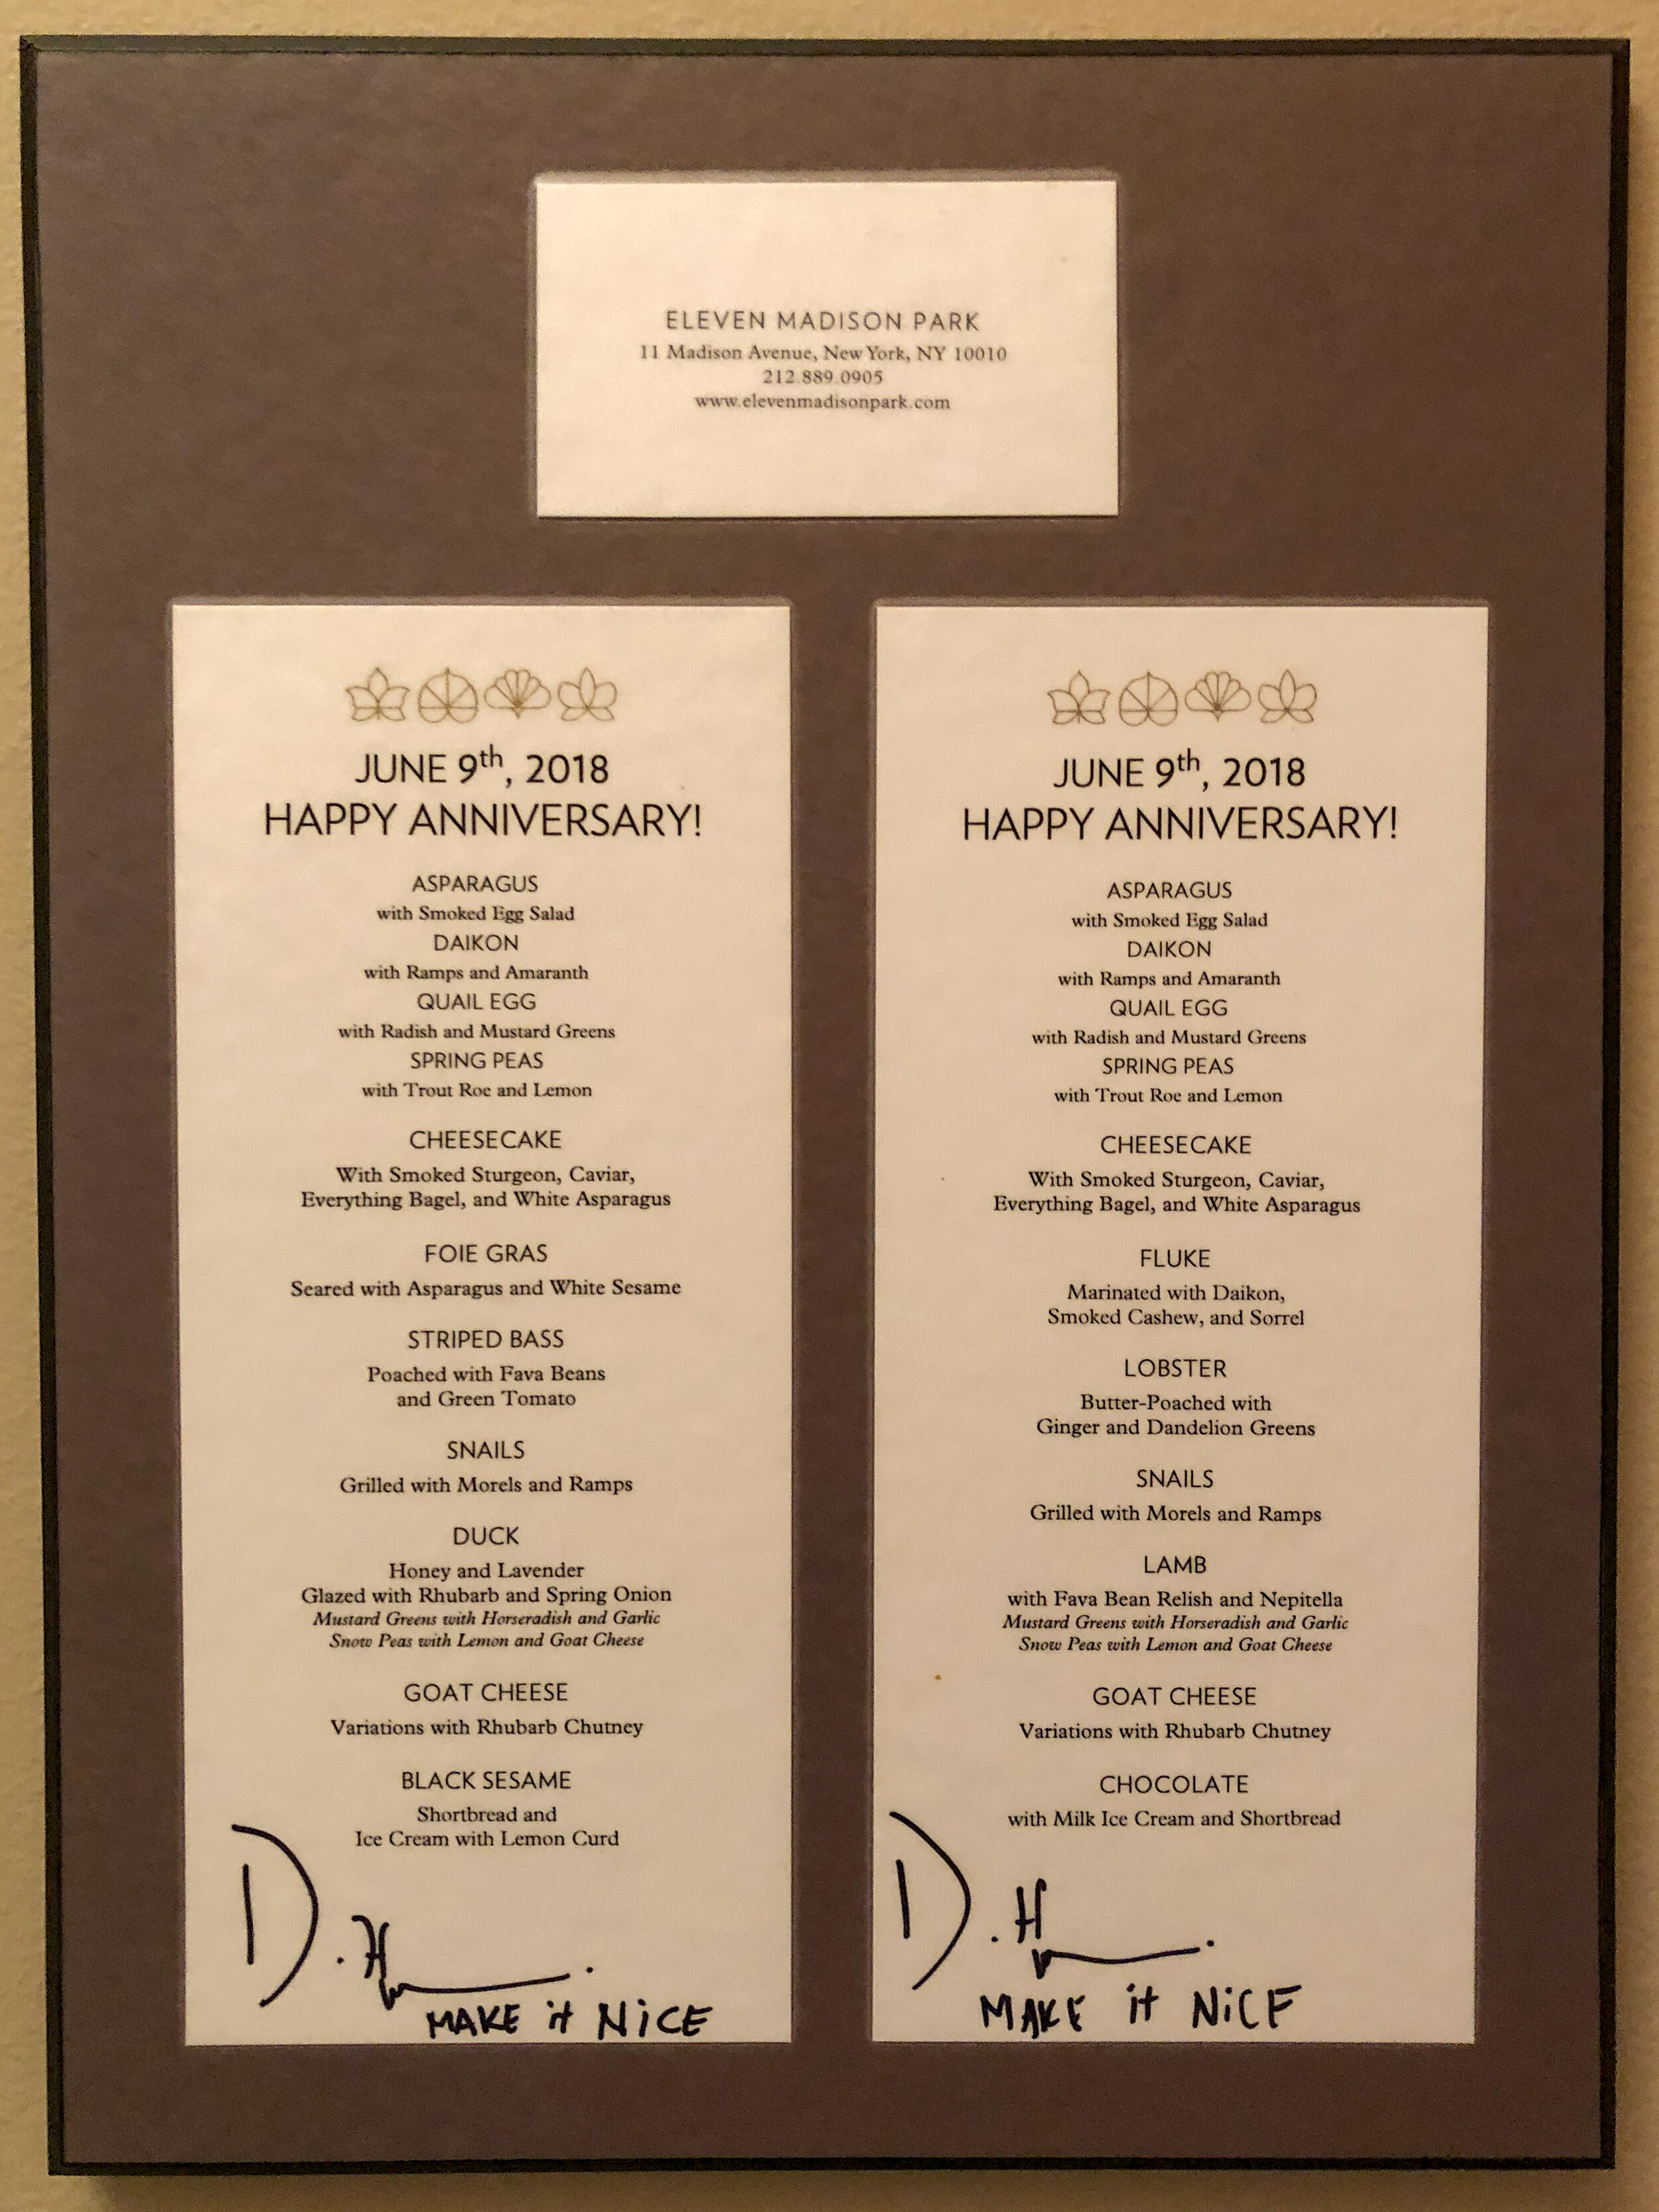
Menu with signature “Honey and Lavender Glazed Duck”, but anniversary is June 10th not the 9th!
After dining somewhere special, I ask if I can see the restaurant’s kitchen and meet the chefs to thank them. On our tour of Chef Humm’s kitchen, I noticed a large refrigerator full of ducks. I didn’t think much of this until dining at Hexagon in Oakville, Ontario, when I asked Chef Rafael Covarrubias the secret to his duck. No matter the preparation, his duck is always delicious and his “mole negro spiced Muscovy duck, preserved prune, and winter roots” won him the S.Pellegrino Young Chef Competition regional finals in New York City. This earned him a coveted spot as one of only 12 chefs invited to compete in the international finals in Milan.
While clearly both chefs brought something unique and special to their duck, it couldn’t be coincidence that both first dry-aged them!
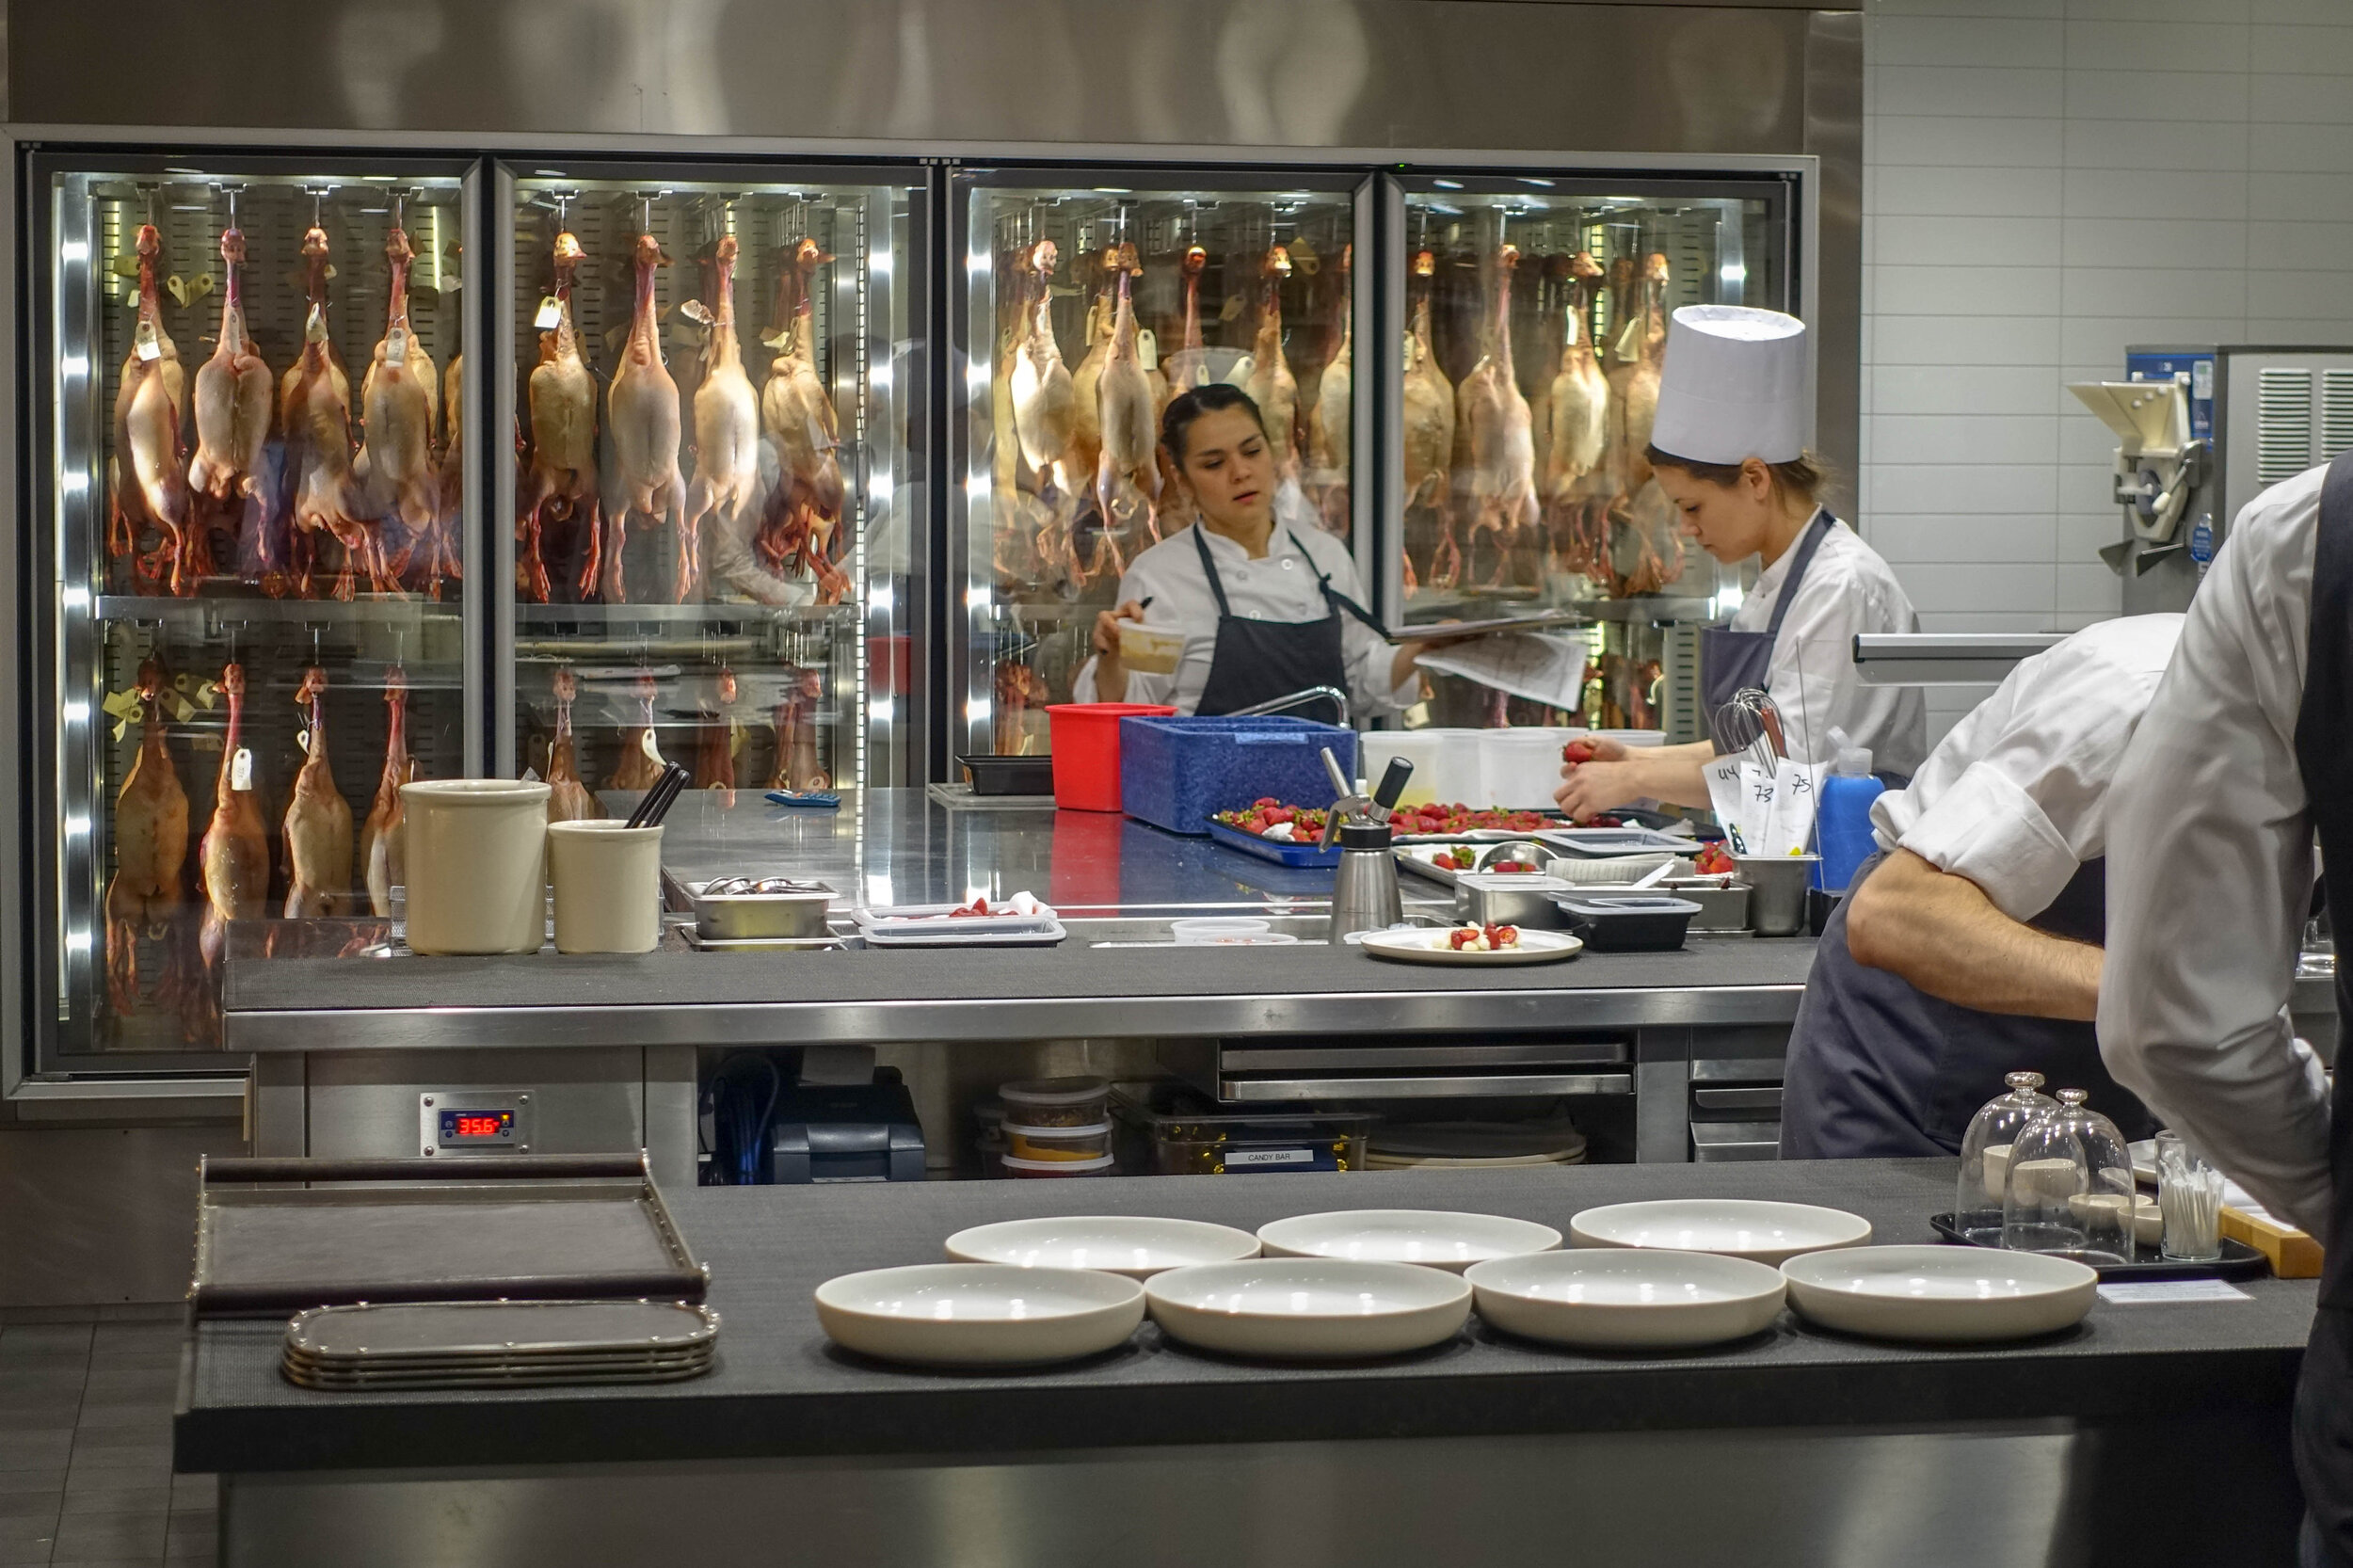
Ducks dry aging at Eleven Madison Park restaurant.
As I love to cook and eat duck, I added dry-aging to my long list of things to try in the kitchen. It wasn’t until now that I got around to it, primarily because 1) Covid lockdown has provided me with way too much time at home and 2) I read Sasha Marx’s Big Duck Project. He is a senior culinary editor at Serious Eats and just completed an eight part series on duck, including posts on how to dry-age a duck at home and how to roast it.
As he points out, while dry-aged beef is relatively easy to source, it is much harder to find dry-aged duck outside high-end restaurants. If you want a dry-aged duck, you probably will have to do it your self. But why bother? In part to dry out the skin so it cooks up nice and crispy. But if dry crispy skin is all one wanted to achieve, it is much simpler and quicker to just dry brine poultry.
However dry-aging also enhances both flavour and texture by allowing time for enzymes which are naturally present in the meat to breakdown muscle protein, connective tissue, fat, and glycogen. Glycogen is broken down into glucose, and through the enzymatic reactions proteolysis and lipolysis, large flavourless proteins are broken into smaller, flavourful amino acids while fats are broken into aromatic fatty acids. The increase in tenderness results from both breaking down the proteins and weakening collagen within the connective tissue. In short, the reward for the effort is really dry skin promoting crispiness and extremely flavourful tender meat.
You will have noticed from the dry-aging refrigerator at Eleven Madison Park, whole ducks were hung by the neck. This allows cool dry air to circulate freely and evenly about the bird. Also with the skin intact, the underlying meat doesn’t overly dry out. That is ideal if you have the fridge space, but if you are attempting this at home, better to break the bird down and just hang the smaller crown. (A “crown of duck” in the culinary world is a duck with legs removed and not to be confused with a “duck’s crown” which anatomically is defined as the very top of a ducks head.) While you don’t have to remove the legs, not doing so takes up precious refrigerator space; better to just remove and make confit!
The dry-aging process is straightforward: buy a fresh duck, remove the legs for later use, hang the crown by the neck, and wait.
Does it matter what kind of duck? Well while there are differences between the commercially available species of duck with respect to in particular size and % fat (a post for another day), the important thing according to Sasha Marx is to try and source an “air-chilled” duck. To eliminate potentially harmful spoilage, when poultry is processed they are rapidly chilled, most often by plunging them in an ice-water bath. While effective at chilling, this can add up to 10% of extra water weight. This means your bird costs more because it is heavier from the absorbed water. While this is good for the seller, the added water in theory dilutes the duck’s flavour and makes the skin much more difficult to crisp, worse for the buyer.
In contrast, air-chilled birds don’t take on extra water weight and should be more flavourful and drier at the end of the drying process. Unfortunately, as much as it is worth the effort, it can be difficult to source air chilled poultry. Indeed, I had to settle for a water chilled bird, although I should add the results were still splendid.
The tricky part is making room in the fridge! I bought a cheap tension spring loaded curtain rod to serve as support from which to hang the duck. Just be sure to get the right length for the width of your fridge. As per Sasha Marx’s instructions, I placed a drip tray beneath to catch any drippings. Any potential dripping is likely to occur in the first few days and stops as the bird dries out a bit. I had very little dripping as it turned out, but better safe than sorry.
Obviously one will want to monitor the process to check for spoilage evident by mold on the bird and/or the smell of rotting meat (I noted a somewhat funky smell in the latter half of the process, but nothing foul, or is that fowl?) Otherwise, as most of us don’t have a dedicated dry-aging refrigerator, one should limit the number and length of time the door is open so as to maintain a fridge temperature of 2-4°C (35-39°F) and minimize temperature fluctuations.

Day 1: Bird with legs removed (Crown) hanging over drip tray (The bottles are for one of my other Covid projects; care to guess what that is?)
In an ideal world, the duck should hang for 10-14 days to optimize flavour and tenderness, but if you can’t spare the time or fridge space, Sasha Marx says some benefit is had after only three days.

Day 12: Skin dry and taught. This is the same paper towel from day 1. Note there was virtually no dripping .
In the photos above and below, you can see that after 12 days the duck skin is taught and the meat a darker red. This is most obvious where the meat was unfortunately exposed from lack of skin covering from the way the bird was processed; no breast meat should be exposed to the air and next time I will be sure there is ample skin covering.

Ready to Roast
Cooking the bird couldn’t be easier, but before doing so, it is best to remove the wish bone as it only gets in the way when you carve the bird. Below is a video for doing so in a chicken, but it is the same process for duck, turkey, indeed all poultry. While the wish bone (clavicle) can be removed before dry-ageing, it is easier to locate and cut out without sacrificing valuable breast meat after dry-ageing, as the skin and flesh around the neck cavity are dry.
I don’t know what the added benefit is, but Chef Rich Torrisi at the Dirty French in New York City (just one of the 21 restaurants he operates as part of the hospitality company Major Food Group) ages his duck at least 21 but ideally up to 30 days before he sears and cooks them at 1000°F in a rotisserie oven! But most normal chefs as already noted, would age their ducks 10-14 days and roast at 200-220°C (400-425°F).
To roast, the duck is first tempered (i.e. brought to room temperature for at least an hour), placed breast side up on a wire rack-lined baking sheet, and baked in a pre-warmed oven. After about 15 minutes one starts checking the temperature with an instant-read thermometer placed in the thickest part of the breast (and not as was done in the Eleven Madison Park video shown at the very bottom of this post by holding a metal probe against your upper lip!). The duck is pulled from the oven when it reaches 48°-51°C (120°-125°F).
The bird is then allowed to "rest up" which allows for carry over cooking to take the bird up to its finished temperature of 54°-60°C (130°-140°F) i.e. medium-rare to upper end of medium. Duck cooked less than medium can be a tad chewy, but even when cooked to the same temperature, it is much more tender than un-aged duck breast. Resting also gives the meat time to redistribute and hold onto its juices when carving.
Rather than having to test the bird with an instant read thermometer as described above, I like to use a “Meater” wireless thermometer. It allows me to easily monitor the temperature without having to open the oven door using the “Meater” thermometer and iPhone app. It also allows me to follow the temperature as the meat rests so I know it has come to up to final temperature and is fully rested. For the geeks, below is a screen shot from my iPhone showing the cook profile as I cooked and rested up the duck.

Cook profile: Pulled from oven at 125°F, carry over cooking takes it to 141°F (purple triangle), and rested up 15 min until temp stabilized and just starts to drop.
The solid green line purports to be the temperature of the oven which it isn’t, but it does show the rapid drop in temperature after removing the duck from the oven after approximately 15 minutes roasting. I removed it at that point because the thermometer showed that the duck’s internal temperature had reached the target of 125°F. This is at the point where the duck’s internal temperature shown by the solid purple line intersects the blue dotted line (target temperature). It is important to note that this is not the final serving temperature however; carry over cooking will cause the internal temperature to rise another 17°F over the next 15 minutes or so outside the oven! This is because the exterior of the bird is basically oven temperature, and when brought out of the oven continues through conduction to heat the interior of bird until thermal equilibrium is reached. At that point the temperature starts to drop which indicates the duck is fully rested. That’s when I pulled the thermometer and carved the duck!

Duck pulled from oven to rest and finish cooking. (The “Meater” thermometer is seen sticking out of the left side of duck.)

My plating of roasted dry aged duck with blackberry sauce. Meat super tender, skin super crispy, and melt in your mouth fat! Think roasted suckling pig.

Chef Humm’s plating of Honey and Lavender Glazed Duck from our anniversary dinner!
Remember that overly dried meat where there was no fat covering? It was just trimmed off and thrown into the freezer with the remaining carcass. That, along with the wing tips which were removed in preparation of the crown, will eventually be used to make stock.

Duck carcass headed for the freezer and then the stock pot
I can say that the effort was definitely worth it; without a doubt the best duck I have ever cooked. As soon as some of those bottles are gone from the top shelf, I will be doing this again!
Now that you have read how I prepared my duck, watch how the pros do it!